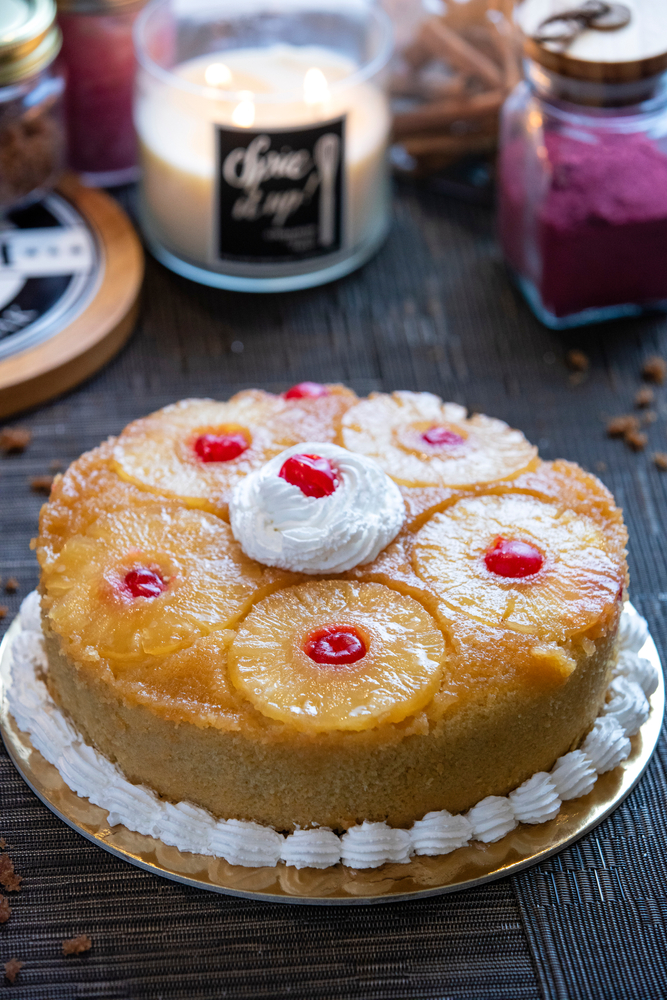
The Cooking Master
  • Home
  • Breakfast
  • Desserts
  • Dinner
  • Easy Recipes
  • Main Course
  • Side Dishes
  • Soups & Salads
  • Vegan
  • Home
  • Breakfast
  • Desserts
  • Dinner
  • Easy Recipes
  • Main Course
  • Side Dishes
  • Soups & Salads
  • Vegan
No Result
View All Result
The Cooking Master
No Result
View All Result

Pineapple Upside-Down Cheesecake

Pineapple Upside-Down Cheesecake

Two favorite desserts in one! This indulgent creation layers creamy cheesecake over a rich, caramelized pineapple topping, set on a buttery graham cracker crust. Sweet, tangy, and decadently tropical.

Ingredients

  • FOR THE TOPPING
  • Cooking spray
  • 4 tbsp. butter
  • 1/2 c. packed brown sugar
  • 1 (20-oz.) can pineapple rings in juice
  • Stemless maraschino cherries
  • FOR THE CAKE
  • 1 box yellow cake mix
  • 1/3 c. vegetable oil
  • 1 c. pineapple juice
  • 3 large eggs
  • FOR THE CHEESECAKE
  • 3 (8-oz.) blocks cream cheese, softened
  • 1 c. granulated sugar
  • 3 large eggs
  • 1/4 c. sour cream
  • 2 tsp. pure vanilla extract
  • 1/2 tsp. kosher salt

Instructions

Steps:

  1. Make topping: Preheat the oven to 350° and grease an 8″ springform pan with cooking spray. In an 8″ cake pan, melt butter in the oven. Add brown sugar to the bottom of the regular cake pan. Spread mixture to the edges, then add 5 pineapple rings. Place cherries inside and in between pineapple slices.
  2. Make the cake: In a large bowl, combine cake mix, oil, pineapple juice, and eggs. Whisk until smooth, then pour about half the mixture over the pineapples in the regular cake pan. Pour the remaining half into the springform pan. Bake until cakes are starting to turn golden and a toothpick inserted into the centers comes out clean, about 20 minutes (the regular cake pan might take an additional 10 to 15 minutes). Let cool.
  3. Meanwhile, make the cheesecake layer: In a large bowl, beat cream cheese with a hand mixer until light and fluffy. Add sugar and beat until smooth. Add eggs one at a time, beating between each addition. Add sour cream, vanilla, and salt and mix until smooth. Pour the cheesecake layer over the cooled baked cake in the springform pan. Wrap the bottom of the springform pan in foil.
  4. Bake until cheesecake is slightly jiggly in the center, 1 hour to 1 hour 10 minutes. (Cheesecakes tend to crack if you don’t use a water bath. If you don’t want to use one, bake as directed. If you do want to use a water bath, double wrap the outside of the pan in aluminum foil and place it in a baking dish. Place on oven rack and pour into baking dish enough boiling water to reach halfway up, taking care not to splash water into the cheesecake. Bake as directed.)
  5. If not using a water bath: Remove the pan from the oven and run a knife around the inside of the pan to release the cheesecake. Let cool 1 hour on a wire rack, then refrigerate until totally chilled, at least 4 hours and up to overnight. If using a water bath: Turn off oven heat, prop open the oven door, and let cheesecake cool in the oven, for 1 hour. Transfer to refrigerator and cool completely, 4 hours up to overnight.
  6. Place cheesecake on a serving plate and top with pineapple upside-down cake.
Previous Post

Make-Ahead Steel-Cut Oats

Next Post

Red Lentil Curry

Next Post
Red Lentil Curry

Red Lentil Curry

Find a Recipe

No Result
View All Result

Popular

    Subscribe Us

    By clicking submit, I authorize The Cooking Master and its affiliated companies to: (1) use, sell, and share my information for marketing purposes, including cross-context behavioral advertising, as described in our Terms of Service and Privacy Policy, (2) supplement the information that I provide with additional information lawfully obtained from other sources, like demographic data from public sources, interests inferred from web page views, or other data relevant to what might interest me, like past purchase or location data, (3) contact me or enable others to contact me by email with offers for goods and services from any category at the email address provided, and (4) retain my information while I am engaging with marketing messages that I receive and for a reasonable amount of time thereafter. I understand I can opt out at any time through an email that I receive, or by clicking here

    Links

    • Contact Us
    • Privacy Policy
    • Terms Of Service
    • Unsubscribe
    • Privacy Choices

    Subscribe Us =>

    By clicking submit, I authorize The Cooking Master and its affiliated companies to: (1) use, sell, and share my information for marketing purposes, including cross-context behavioral advertising, as described in our Terms of Service and Privacy Policy, (2) supplement the information that I provide with additional information lawfully obtained from other sources, like demographic data from public sources, interests inferred from web page views, or other data relevant to what might interest me, like past purchase or location data, (3) contact me or enable others to contact me by email with offers for goods and services from any category at the email address provided, and (4) retain my information while I am engaging with marketing messages that I receive and for a reasonable amount of time thereafter. I understand I can opt out at any time through an email that I receive, or by clicking here

    © 2025 The Cooking Master | All rights reserved.

    No Result
    View All Result
    • Home
    • Breakfast
    • Desserts
    • Dinner
    • Easy Recipes
    • Main Course
    • Side Dishes
    • Soups & Salads
    • Vegan

    © 2025 The Cooking Master | All rights reserved.

    Skip to content
    Open toolbar Accessibility Tools

    Accessibility Tools

    • Increase TextIncrease Text
    • Decrease TextDecrease Text
    • GrayscaleGrayscale
    • High ContrastHigh Contrast
    • Negative ContrastNegative Contrast
    • Light BackgroundLight Background
    • Links UnderlineLinks Underline
    • Readable FontReadable Font
    • Reset Reset